|
edit SideBar
|
This page is obsolete
To do time sheets, it is sufficient to email the time sheet without a signature.
It is nice if there is a signature, to create one, create a stamp.
This page is primarily for staff people who need to fill out a timesheet, but could be of use to anyone who wants to try to sign a PDF file with a certified signature.
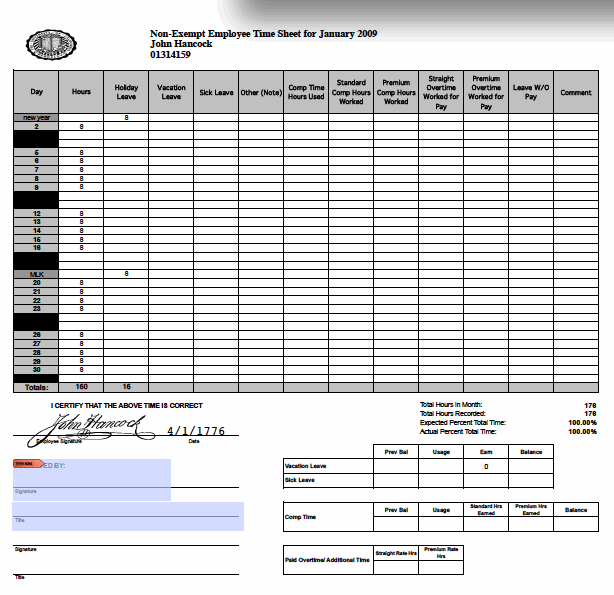
Our goal is to create an electronically signed time sheet that contains your signature that is backed with a certificate. See JohnHancockSignedTimeSheet.pdf, which is reproduced below as an image:
The above image has:
- The signature of the employee
- The date it was signed
- A field for the signature of the supervisor
- A field for the title of the supervisor
Why use certificates?
- Signatures pasted in to pdf files are worthless as far as security is concerned. These are just bits in a file, easy to manipulate.
- Printing out a document, signing it and scanning it in is a waste of time and paper.
- By having signing a pdf file with a signature that is backed with a certificate, we add a layer of authentication that at the time the signature was applied, the person applying the signature knew the password of the certificate.
- The recipient of the certificate can choose to trust the certificate so that in the future, the certificate can be validated.
Why not use certificates?
- The non-free version of Adobe Acrobat is required to sign documents.
- The Mac OS X Preview program will not show the signature.
- The set up procedure is complex.
- It looks like the UC Berkeley certificate does not use a trusted certificate authority?
- I'm told that one issue is that the certificate obtained from UC Berkeley advertises a Online Certificate Status Protocol (OCSP) (http://en.wikipedia.org/wiki/Online_Certificate_Status_Protocol) address for determining if a certificate has been revoked. Unfortunately, there is no server at that address. As a result, Acrobat does not completely trust the UC Berkeley supplied signature. There are no plans at this time for IS&T to supply a OCSP server, see http://ls.berkeley.edu/mail/micronet/2009/0869.html
- The UC Berkeley certificate is not available to students. Staff that used to be students could have difficulties.
Setting up your certificate
- Scan a copy of your signature. Mary knows where various ERSO scanners are located, or use the scanner in the DOP Center. Our end goal is to create a transparent pdf.
- Write you name with a blue felt tip pen. Felt tip scans better than ball point, blue looks more official.
- Scan as a high resolution tiff (you may need to try various resolutions, try 300dpi) and save the image as a file. An image size of around 600x250 seemed to work.
- Open the image with Photoshop. If you don't have Photoshop, ask Mary or Christopher.
- Within Photoshop, click on the magic wand and select the background.
- Try changing the tolerance, I used 16
- Try turning on anti-aliasing
- Duplicate the layer by clicking on the icon that has small horizontal lines above the layer pane and choosing "Duplicate Layer", click OK in the dialog
- Select the layer named "Background"
- Delete the "Background" Layer by clicking on the same icon above the layer pane and selecting "Delete Layer", click Yes in the dialog.
- In the pane that has the signature, be sure the background is selected and hit the delete key. The background should turn to a grey and white checkerboard pattern, signifying that it is transparent.
- Do File -> Save As and save as a Photoshop PDF
- In the "Save Adobe PDF" window, select "Compression" and set "Do not downsample, then set Compression to JPEG and Image Quality to Maximum.
- If you do not yet have a CalNet ID, see https://calnet.berkeley.edu/id/. Basically, you need to go to the help desk in 395 Cory (see https://iris.eecs.berkeley.edu/help) with photo id, get a token and then get your CalNet ID.
- Be sure that your CalNet ID has your email address associated with it. To check, go to https://calnet.berkeley.edu/directory/ and search for yourself. Your email address should be present. If your CalNet ID does not have your email address associated with it, then add it via https://calnet.berkeley.edu/directory/update/.
- Get a personal certificate by going to https://calnetpki.berkeley.edu:51443/authentication.asp (CalNetPKI services for End Users) authenticating and requesting a certificate. To request a certificate, you will need a CalNet ID (see above) and must not be a student. You will only need to request a certificate once, the same certficate is used until it expires (probably one year). For details, see https://calnetad.berkeley.edu/Services/CalNetPKI/Pages/default.aspx (General Information about CalNetPKI). If getting a personal certificate from campus fails, or if you are a student, try https://www.thawte.com/secure-email/personal-email-certificates/index.html.
- From a Vista or Windows Server 2008 machine (such as
winterm.eecs, go to https://calnetpki.berkeley.edu
- Install the PKI Root certificate:
- Follow the "Download the CalNetPKI campus root certificate". In some cases, even if the test fails it is necessary to install the campus root certificate.
- You may need to install the certificate in the "Trusted Root Certificate Store"
- Go to https://calnetad.berkeley.edu/Services/CalNetPKI/Pages/default.aspx
- Follow "User Certificates" to https://calnetad.berkeley.edu/Services/CalNetPKI/Pages/UserCertificates.aspx
- Click on "Here" at the bottom and go to https://calnetpki.1918.berkeley.edu/certsrv/
- Click on "Request a Certificate" and go to https://calnetpki.1918.berkeley.edu/certsrv/certrqad.asp
- Click on "Create and submit a request to this CA." If prompted by IE Security that Certificate Enrollment Control wants to run,click "Allow"
- At this point, you must be running IE under Vista or Windows 2008, otherwise the CSP field will say "Loading". Under "Certificate Template", select
UCB.User. CSP remains as the default Microsoft Enhanced Cryptographic Provider, everything else is the default.
- Click "Submit". A window pops up: "The website is a new certificate. . .", click Yes
- IE Security control says that Certificate Enrollment control wants to run, click "Allow"
- The page says "Certficate Issued". There is an "Install this Certificate" link, click on it.
- A Web Access Confirmation window comes up: "The web site is adding one or more certificates . . .", click Yes
- If the page says "This CA is not trusted", then make sure that the CalNet Root PKI Certificate is installed (see above).
- In your browser, back up your certificate file to a safe place.
- In Firefox, try Advanced -> Encryption -> View Certificates -> Backup All.
- In IE, try Tools -> Internet Options -> Content -> Certificates -> Choose a certificate -> Export -> Yes, export the private key (If you don't export the private key, you won't get the .pfx extension necessary for Acrobat).
- Note the location of the file and remember the password used to save the backup, we will need them below. Your certificate file is password protected, so only someone with the password can use it, so it is not much of a security concern if someone other than yourself has access to the certificate file.
Getting started with your timesheet
See the http://www.erso.berkeley.edu/tools/tools_003.shtml (ERSO Payroll Page) for details about timesheets.
There are several different versions of the timesheet
- Programmer/Analyst II - Fill out a non-exempt timesheet
- Specialist II - Fill out an Academic timesheet
How to do a timesheet:
- Download the appropriate timesheet from the http://www.erso.berkeley.edu/tools/tools_003a.shtml (ERSO Payroll Page)
- Fill out the first page of the form. Your vacation and sick leave accrual rate depends on your position. Employees on short term appointments, such as Jr. Development Engineers earn sick leave at 8 hours/month. However, sick leave cannot be used in the first month. Ask your supervisor for details about accrual rates.
- If you did not start on January 1, then in Excel, go to the month that you first worked and select Tools -> Unprotect Sheet (Microsoft Office 2003) or Review -> Protect Sheet (Microsoft Office 2007) and then enter a 0 for your
Prev Bal for both Vacation and Sick Leave.
- If you did not start on the first of the month, then be sure not to claim those days as work days. To do this, set one of the optional fields such as "Other (note)" or "Leave without pay" to 0 for the days you did not work.
Filling out your timesheet for the current month
Follow these steps each month
- Fill out your timesheet. For non-exempt employees, overtime is not permitted unless cleared with your supervisor in advance, so most days should be 8 hours. For exempt and academic employees, only record vacation and sick days.
- Important: send only the current month to your supervisor. To do this, create a new Book with just the current month: Edit -> Move or Copy Sheet -> To Book: new book and select create a copy. The file you send should have just one month and should have a name like: yourlogin09-2008.xls
- Print your timesheet to PDF. Under Windows, this requires the non-free full version of Adobe Acrobat. Under Mac OS X, you can just save the Excel page as PDF. Be sure to print the document to one page, some of the timesheets are too wide and span multiple pages. One way to do this is to set the margins to zero.
- Open your the printed pdf file with Adobe Acrobat 9.0. Adobe Acrobat Reader will not work, Adobe advertises Reader as being able to sign, but Reader requires additional, non-free software to sign. If you do not have Adobe Acrobat 9.0, check on shared machines like Newton (see http://embedded.eecs.berkeley.edu/ransom). Acrobat 8.0 does not allow images of signatures to be used. To obtain Adobe Acrobat, see the IST |Software Central - Other Software page at http://software-central.berkeley.edu/other_software_resources. Both SHI and The Scholar's Workstation have the full version for sale.
- Use the typewriter tool to add the date: In Acrobat, Tools -> Typewriter -> Typewriter, then move the cursor to the Date field and enter the date
- In Acrobat, we can sign documents and certify documents. It looks like a document can only be signed once, that is, once the document is signed, no more signatures can be placed in random locations in the file. However, if the first user adds signature fields to the document, then multiple people may sign.
- In Acrobat, select Forms -> Add or Edit Fields. When the "Add or Edit Form Fields" window comes up, click on No so that fields are not automatically detected.
- Click on "Add New Field" and select Digital Signature and place the signature field near the Employee Signature line. It is best if your signature field is rather large and overlaps the line so that any decenders in the signature will be rendered below the line on the pdf.
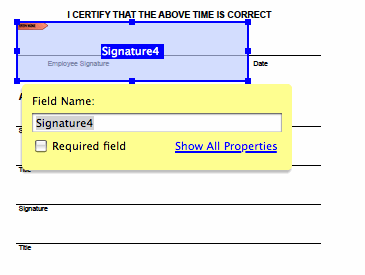
- Add another Digital Signature field for the Supervisor signature
- Add a text field for the title of the supervisor.
- Click on "Close form for editing"
- Now, add your signature: Advanced -> Sign and Certify -> Sign Document.
- The first time you use your signature, you will need to follow these steps:
- When the "Add Digital ID" window comes up, select "Browse for an existing digital ID file", browse to the certificate file saved from your browser, type in the password used to backup the certificate and hit finish.
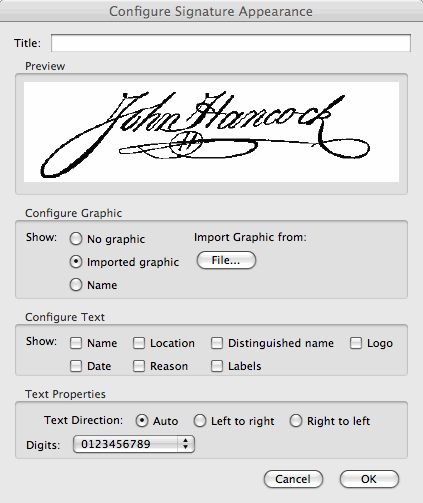
- In Acrobat 9, you can then add your scanned in image by selecting "Create New Appearance". Unfortunately, in Acrobat 8, you can't add the image.
- In the "Configure Signature Appearance" window, go to the "Configure Text" pane and deselect "Name", "Location" and everything else in the "Configure Text" pane. The reason is that we want the signature to include just the signature and not the descriptive text. Below is a screen shot of the window:
- After you have used the scanned image of your signature, encrypt or otherwise secure the image file so that it cannot be used by others.
- After signing, you will be prompted to save the document.
- Mail that signed document to your supervisor
Problems getting a certificate
It turns out that Students may have problems getting a certificate from UCB. The error message is:
Certificate Request Denied Your certificate request was denied. Your Request Id is 1328573. The disposition message is "Denied by Policy Module" because "The EMail name is unavailable and cannot be added to the Subject or Subject Alternate name.". This certificate supports e-mail signing. For e-mail signing, an e-mail address is read from the CalNetAD directory and included inside the certificate. By Fall 2004, CalNetAD will automatically syncronize the e-mail address from the CalNet LDAP directory. Currently, your e-mail address field is not populated, causing the certificate request to fail. Until syncronization is in place, please contact your OU administrator to add your e-mail address to your CalNetAD user object.
1. Try searching for yourself in the Calnet Directory at https://calnet.berkeley.edu/directory/ and make sure your email address is listed. If it is not, then go to Calnet Directory Update at https://calnet.berkeley.edu/directory/update/ and add your email address.
2. Note that UCB certs are not available to students. Support says:
The user's email address is not being synced to his account because the user account exists in the Students OU. FERPA-related restrictions prevent the synchronization of students' email addresses. I've been told this will probably eventually be lifted once all students have changed to a friendly name.
The upside of a Verisign email signing cert is that it is also recognized by off-campus sources - something that is not true of the internal PKI service.
Let me know if I haven't sufficiently answered this for you,
Problems importing a certificate into Acrobat
- Acrobat does not see the signature file.
If you used Microsoft Internet Explorer, make sure that you export the private key with your certificate so
that you get a file with the appropriate extension
Problems viewing the signature
Interestingly, the Preview program in Mac OS X will not display the signature. One workaround would be to print a locked, uneditable pdf file.
Acrobat says "At least one signature has problems"
The first time you receive a pdf file with a certificate, you might see a message: 
This probably occurs because of a problem with Online Certificate Status Protocol (OCSP). In the perfect world, you would make in-person contact with the sender and exchange certificates. An alternative is:
- In Adobe Acrobat, right click on the signature and select "Validate Signature"
- In the Signature Validation Status window, click on "Signature Properties . . ."
- In the Signature Properties window, click on "Show Signature"
- In the Certificate Viewer, click on "Trust" and then "Add to Trusted Identities"
- In the Acrobat Security window, hit OK
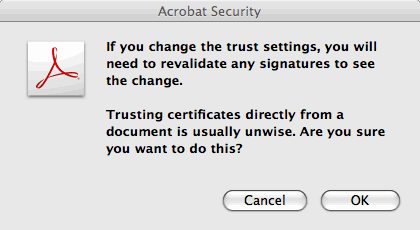
- In the Import Contacts Settings, hit OK
- Hit OK to close the Certificate Viewer
- In the Signature Properties window, click on "Validate Signature". The signature should now be valid.
|